Friday, February 22, 2013

Banana Muffins

Yes...I made banana muffins again! It seems to be a reoccurring theme around here. The reason why I make them so frequently is the kids devour them, there are so many variations (that make them taste totally different) and they can be made totally healthy and vegan or totally indulgent.

The following recipe is how I made them and everyone loved them. I have included in the brackets how you adjust the ingredients to yield a slightly more decadent cafe style banana muffin/cake. I always make my muffins in the mini cupcake pan so they are perfect for little hands, but you could easily make regular sized muffins or even a cake with this recipe. In addition to the mini muffins (you can see one in the picture below) I also made heart shaped muffins as well.

Banana Muffins

  • 4 large bananas (could use three for a milder taste)
  • 1/2 cup white sugar (1 cup for a sweeter muffin)
  • 1 egg, beaten
  • 1/4 cup margarine or bitter (1/3 cup for a richer taste)
  • 1/2 tsp baking powder
  • 1/2 tsp baking soda
  • 1/2 tsp salt
  • 1 1/2 cup flour
  • 1/2 tsp cinnamon (optional)
* Preheat oven to 350, grease muffin pan or line with liners
* Mash bananas then cream with butter, egg and sugar
* Add in flour, baking soda, baking powder, salt and cinnamon. Stir till well combined
* Pour into tins and bake. Approx 15-17 mins for mini size, 20-22mins for regular and about 25-30mins for a cake. (as oven temps may very make sure to insert knife or toothpick if it comes out clean then this will ensure it is cooked all the way through) 

Shaped Pizza

Valentine's is usually a time when people go all out with dinner. Some people who never cook are suddenly inspired and attempt a 5 course meal or at the very least a fancy dessert. The other option is the over crowded restaurant. Seeing as I make dinner every single night of the week, from scratch, I thought Valentine's was the perfect day to make something a little different and get into the spirit of things.

This recipe is really more of a guide. Just like ordering a pizza you can put what ever toppings you enjoy on the pizza. A store bought crust is the perfect base for this dinner along with some salad and a dessert. Any shape pizza could be cut out of the crust but the large heart wastes the least crust and the mini ones maximize the crust as well.


Shaped Pizza
  • 1 store bought crust, cut into a large heart or into mini ones using a cookie cutter
  • tomato sauce, usually provided with crust
  • 1 cup shredded cheese
  • veggies of your choice
  • olives (optional)
  • meat choice (optional)
  • 1 tsp butter
  • 1/2 tsp garlic powder or 1 clove garlic
  • oregano to taste
*  Spread sauce in a thin even layer on the crust, we only use half the package
* Finely chop all vegetables and put in microwave safe bowl with butter and garlic, cook for 1-2 minutes, veggies should be slightly softened and dried (this prevents the crust from getting soggy, since when fresh veggies cook the release water)
* Put veggies on crust, with olives or any other toppings you choose, top with cheese. Alternatively you could put the veggies on top of the cheese, I just find the cheese on top prevents anyone from picking any veggies off and I think it tastes better
* Sprinkle with oregano 
* Bake in oven as package directs, usually 425 for 12 minutes

Friday, February 1, 2013

"Fresh" Dried Herbs

If you are like me you are always trying to infuse your meals with extra flavour but without extra salt, sugar and sauces laden with preservatives. Herbs are a great way of doing so. Although I prefer fresh herbs I find they always spoil before I can use the whole package. I do buy dried herbs from the local bulk store but sometimes they have a bland taste. I also wonder how long they have been sitting in the bins or jars.

Previous to making dried herbs the way I am going to share with you I always pictured having plates of herbs out drying for days or hanging from various spots in the kitchen. This is an easy way to get fresh dried herbs and know exactly what is in them. Best thing is there is no extra baking or time involved...just do the following steps next time you are already using your oven! I make my herbs after we have made muffins or cookies.

Dried Herbs
  • fresh herbs (mint, sage, rosemary, etc.), washed if needed and dried
  • spread out evenly on cookie sheet - I make aluminum foil dividers so I can put more than one herb on a sheet
  • place the sheets in heated oven - after shutting it off from your previous baking/cooking
  • leave overnight in the morning remove and place in Ziploc bag
  • gently shake in bag to crumble the leaves and for the leaves to follow off the stems, remove stems from bag
 That is it...you can store your herbs in spice jars or leave in the bags. Now you know how to have fresh herbs that didn't involve extra electricity, time or weeks of waiting. 

Thursday, January 17, 2013

Egg "Muffins"

Kids seem to like anything they can pop into their mouth or eat with their hands. The below recipe is for easy eggs that taste great, are portable and are healthy. Swap any of the veggies listed for leftovers you have in the fridge. I always make a few extra and store them in an airtight container in the fridge, perfect for snacking or a quick protein source with toast or soup. This could easily be an appetizer for adults by adding smoked salmon!

"Muffins"
  • 4 eggs
  • 1/4 c milk (sub in soy/almond etc.)
  • 1/4 c broccoli
  • 1/4 c mushrooms
  • 1/4 c shredded cheese (optional)
  • 5 olives diced
  • s & p to taste
* Preheat oven to 425F
* Whisk together eggs, milk and s & p
* You can saute the veggies in a little oil if you have time or nuke them for about 1 minute in the microwave. I find this makes them less liquidity when cooking in the oven. This step is unnecessary but one that I do recommend
* Add veggies to eggs, pour into greased or lined muffin pan and top with shredded cheese
* Cook for approx. 20 minutes for the mini muffins or 25 for the regular size. Prick with a knife when it comes out clean they are done

Enjoy!

Saturday, June 30, 2012

Canada Day Weekend!

Happy Canada Day to all my fellow Canadians! Whether you are here or abroad I hope you enjoy the benefits of the long weekend!

With the holiday weekend it means fireworks and treats! Here are two that I know we will be enjoying whether it is while watching the fireworks or just relaxing with friends...who really needs an excuse! For the first one the boys and I made Homemade Caramel Corn (recipe here) and put it into cute little popcorn containers, that we picked up at Party Packagers.

Delicious Homemade Caramel Corn

Cute Red and White Maple Leaf Gummy Candies

Thursday, June 28, 2012

Granola Bars #2

If you tried the recipe we made here, you probably found them to be a cake like texture and quite moist. They were a hit with children and adults a like, but I wanted to created something a little more granola-bar like but with some nutritional value.

The best part about this recipe is instead of flour or any pre-bought flour substitute I ground oatmeal in the Magic Bullet. This is such a wallet friendly way of being able to use wheat free flour, if you are Gluten intolerant make sure your oatmeal says 'Gluten Free' right on the packaging. (If it doesn't, quite often it has been made in a facility that also makes wheat products.) You can use regular flour or one of your choosing as well.

You can put any dried fruit you desire in. We added diced dates and apricots, for extra fiber.
Yummy Granola Bars
  • 2 c. regular oatmeal
  • 1 c.  oatmeal, ground into flour
  • 1 pkg grits (or 1/4c. wheat germ + 1/4c. ground flax)
  • 1 tsp cinnamon
  • 1/4 c. diced apricots
  • 1/4 c. diced dates
  • 1/2 c. sweetened coconut
  • 3/4 tsp sea salt
  • 1/2 c. honey
  • 1 egg, beaten (use egg replacement if you are vegan or allergic)
  • 1 Tbsp oil
  • 1 individual apple sauce (if you don't have this on hand use 1/2 c. oil)
* Preheat oven to 350
* Grease 9 x 13 pan
* Mix together oatmeal(s), grits, cinnamon, salt, stir well then add coconut, apricots and dates, stir well
* Add in honey, egg, oil and apple sauce, stir till all moist and press into pan, packing them down
* Cook for 30 minutes until slightly browned, remove from heat and let cool for 5 minutes then cut. Don't let over cool or they may crumble when cutting

Monday, June 25, 2012

Protein Granola Squares

The following recipe was an attempt to find something similar to a granola bar, but a little bit more filling and healthier than the fructose ones that the stores sell. I find that by adding a little protein powder it makes the squares more filling and that much more healthy. It can be omitted though and the recipe would be equally as good. I used the vanilla one sold by Arbonne. 

I used Teff flour instead of all purpose flour to make it Gluten Free, but you could use regular flour if consuming wheat is not a concern. These were a hit so next time I will double the below recipe, as shown it made about 16 squares.
I made these thick so they are like squares
Protein Granola Squares
  • 1 cup oatmeal
  • 1/2 cup grits (or 1/4c wheatgerm + 1/4c ground flax)
  • 1 tsp cinnamon
  • 1/2 cup Teff flour (or all purpose, whole wheat flour, etc.)
  • 1/3c raisins
  • 8 apricots, cut into raisin size pieces
  • 1/4 tsp salt
  • 1/4 c brown sugar
  • 1/4 c honey or maple syrup
  • 1 egg
  • 1 tbsp oil (I used olive oil, but any type would work)
  • 1/3 c apple sauce unsweetened (or one individual one)
  • 1 tsp vanilla
  • 2 scoops Arbonne vanilla mineral powder (optional)
* Preheat oven to 350
* Grease 9x13 pan if you want thin, slightly crisper bars or a 9x9 if you want them with a more cake-like consistency
* Mix everything together adding liquids last (honey, vanilla, egg, apple sauce)
* Pat evenly into pan
* Bake for approx. 25 minutes until golden brown and cooked but still slightly soft. They will firm up when after cooling so you don't want them to be over cooked or they will become crispy
* Cool for 5 minutes then cut, make sure to cut them before they completely cool for greater ease

MMMM

Thursday, June 21, 2012

Wrapping Veggies For The BBQ

In the summer we quite often try to cook our whole meal on the BBQ. Frequently we wrap our veggies, potatoes, etc in aluminum foil then place on the BBQ. The only problem with this is that sometimes when putting the item that is to be cooked in the foil the liquids run out...and that is before it even gets on the grill.

Here is a simple technique to get a perfect 'basket' for the dish you are grilling. Whatever the amount you are cooking you need double the size of the bowl. (e.g. small amount of potatoes use a medium bowl.) Leave 2-4 inches extra foil around the top of the bowl.
Empty Bowl  

Foil Placed Into Bowl, With 4" Surplus Around Sides
Place Mixed Food Into Foil Lined Bowl
Bring All Sides Together In Center, Twist the Excess Foil Together, Gently Press Down, Remove From Bowl

Tuesday, June 19, 2012

Gluten Free Banana Muffins - NO Special Flour Needed!!!

Anyone who has a wheat or gluten allergy or is just trying to cut back on eating wheat knows how complicated some of the ingredients are, let alone searching for them. Maize flour, Arrowroot flour, Chia flour, etc. Even when you find these flours they are expensive and you may be stuck with a bag of flour that you dislike the taste of.

The following recipe is one that I made muffins with using oatmeal, yes regular plain oatmeal!!! Some stores do have oatmeal flour available for purchase but I just placed regular oatmeal in the Magic Bullet/food processor and grinded the oatmeal into flour myself.

The result was ultra moist, tasty and easy muffins! They are pretty healthy to boot! You can use a greased pan or as I recommend lined muffin tins. I used egg replacement to make these dairy free. There is margarine but we use soy margarine that doesn't have dairy. A regular egg and margarine will yield the same results. This recipe yielded me 24 mini muffins and 6 large ones. I placed a chocolate chip on each one purely for decoration and to entice the boys...it worked, but wasn't necessary...they inhaled these!

Banana Muffins
  • 3 or 4 bananas, mushed (I used 4 for extra moisture)
  • 1/4 c honey
  • 1/4c brown sugar, packed
  • 1/3 c margarine or butter
  • 1 egg (or egg replacement as per directions) 
  • 1 tsp baking soda
  • 1 tsp baking powder
  • 1/2 tsp salt
  • 2 tsp vanilla
  • 1/2 tsp cinnamon
  • 1 1/2c oatmeal, grinded (I measured it prior to grinding and grind until it is almost flour like in texture)
* Preheat oven to 350
* Mix mashed bananas, honey, sugar, margarine and egg together
* Add in all ingredients but oatmeal and combine until completely mixed
* Add in oatmeal and stir until totally incorporated
* Scoop into greased or lined muffin tins, top with chocolate chip (optional)
* Mini muffins took 15 minutes to cook, large ones took 20 minutes

MMMMuffins!!!

Sunday, June 17, 2012

"Disposable Plates" Review


http://www.mindfultable.ca/wp-content/uploads/PC-Eco-Cornstarch-Dishes.jpg
Dinner & Side Plate, Bowls and Tumbler (blue colour was not available at the store I was at)


Like many other people I know they love the convenience or safety of having disposable plates for outdoor eating but feel slightly guilty about the environmental damage that they cause.

I was wandering through The Real Canadian Superstore the other day and came across a PC Eco Living line. It was somewhat sandwiched between all the other table setting and greatly reduced, so I am not sure if this is a line they will always carry, if it is seasonal or a discontinued line that didn't sell as well as expected. The line consisted of two plate sizes, tumblers, bowls and a serving bowl, all coming in a tan and off white. (Although I did find the above picture showing the off white and blue, so I am not sure if blue is available at other locations) I purchased the dinner and side plates and we tried them out.

They were sturdy enough that you can use them as you would a regular plate (cut meat on them, put hot items on them), without having to worry about your kitchen tableware dropping and leaving your deck covered with glass. They are dishwasher friendly, and came out looking like new. They are biodegradable and made 70% out of cornstarch, so when you are done using them in less than a year of entering a landfill or compost they will have biodegraded. The down side was that they have a slight odor to them, similar to corn starch and they don't go in the microwave (but no one should be microwaving plastics anyways, but we can get to that another day).

Friday, June 15, 2012

No Grocery Dinner

I generally pick up groceries at least 3 times a week. On a week such as this one between the amazing weather, a school trip and a sick little boy I only have made it once. . .along rolls Thursday night and I have nothing to make for dinner!

I threw this dinner together using thawed chicken breasts, broccoli (but you could use any veggie you have on hand) lentils and rice. These or a variation of these are pretty much kitchen staples, so this meal is perfect when you haven't made it to the market.


Lentil Rice with Chicken
  • 1 1/2 cups uncooked rice
  • 1 cup dried lentils or canned
  • 2 chicken breasts, cut into dice sized pieces
  • 1 cup broccoli, cut into bite seized pieces
  • 1 Tbsp lemon pepper seasoning
  • 2 cloves minced garlic
  • 1 Tbsp Piri Piri sauce, any type of BBQ/hot sauce would work (optional)
  • 1/4 Tsp Cinnamon
* Cook rice as you normally would, but add 1/2 a bouillon cube and a splash of hot sauce (optional)
* Rinse lentils (if canned or dry), if dry place in 2 cups water with some salt, bring to a boil then reduce to simmer, cooking until lentils are soft but not mushy,  about 12-15 minutes
* Saute garlic in olive oil add in chicken and lemon pepper and cook on medium high until thoroughly cooked, about 6-8 minutes. Add in broccoli at 4 minute mark
* Add in cooked rice, drained lentils, cinnamon, salt and pepper and stir
* Let rice cook for 2 minutes, slightly 'crisping' then stir and 'crisp' for another 2 minutes then repeat one more time (you may need to add a little water to ensure the rice doesn't dry to the bottom of the pan)

Easy, Tasty, Healthy...and no groceries needed!


Wednesday, June 13, 2012

BBQ Potatoes

These potatoes are a perfect easy side to pretty much any meal. There is not one obvious taste or any overly strong flavors so they are perfect for serving to company, especially when you have several palates to please. 

I wrap these in tinfoil and place on the BBQ, but they could just as easily be cooked in the oven. For extra taste (and to be honest eye appeal) when they are close to being done I take them out of the foil and and place them on the BBQ to get some grill marks. If you know your family or guests are fans of spicy food add a little hot sauce in with the oil and lemon.

Serves 4

BBQ Potatoes
  • 12 small potatoes, each washed and cut into 4 wedges (for baby potatoes use 24 and cut into halves)
  • 1.5 Tbsp olive oil
  • 1.5 Tbsp lemon juice
  • 1 tsp paprika
  • 1 Tbsp oregano
  • 2 cloves garlic, minced
  • s & p

* Combine all ingredients in a bowl, stir well and wrap in tinfoil
* Cook in preheated BBQ at med-high for about 20 minutes (our family likes cooked but not soft potatoes, you may find you need to cook yours for longer to suit your tastes)
* Remove from foil and place on grill for 5 minutes, during this time turn potatoes 3 times to ensure grill marks on each side

Enjoy!

Tuesday, June 12, 2012

3 Dishes and A Pan

Sometimes it is a common thought that in order to have the tasty & healthy food we want, we have to sacrifice our time or we save our time and end up eating not so healthy fair. The following recipe is fast, super easy to make and if you double or triple it you can turn it into tomorrow and the next nights dinner and no one will be the wiser.

The first dish is the base for all the recipes. I prefer it cooked on the BBQ, but doing it in the oven works just as well. Dish #1 is perfect on top of salmon (check out my recipe here), or as a delicious vegetable side to any meal. The second is pasta sauce, which you could add ground beef to, should you choose to. The third is a version of the tomato soup recipe I shared previously.
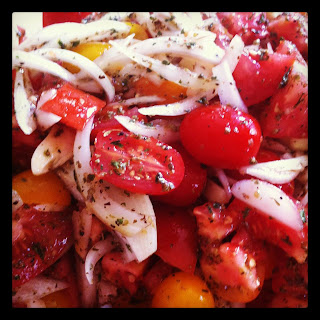
Raw Tomato Mixture


Tomato Topping - Dish #1
  • 1.5 pints of cherry tomatoes + 1 regular tomato (alternatively you could use 7 regular tomatoes)
  • 1 medium sized onion, cut into thin strips
  • 6 cloves of garlic, peel and cut in half
  • EVOO, enough to thoroughly coat mixture
  • s & p
  • hot sauce, optional
 * Cut half of the cherry tomatoes in half, leave the other half whole. Cut the regular tomato into several chunks, about 8. Do the latter for all the tomatoes if not using any cherry tomatoes
* Combine all ingredients in bowl and stir.
* Bake in Pyrex baking dish in the oven at 400 for half an hour or until the tomatoes have wilted and the onions are soft. If cooking on the BBQ place it in aluminum tray and cover with foil, or put directly in foil and wrap so all the ends meet at the top (kind of like Wontons in Wonton soup) you can BBQ it at medium-high for 20-30 minutes (if you are making extras cook it all this way at once)
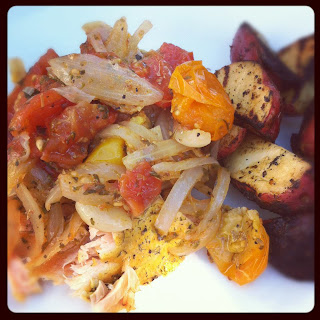
Tomato Topping on Salmon with a Side of Potatoes

Pasta Sauce - Dish #2
  • cooked leftovers/extras from Dish #1
  • 1 Tbsp oregano
  • 1 Tbsp parsley
  • 1 tsp Chili powder
  • 1 lb ground beef, browned (optional)
* Add spices to 'Tomato Topping' and warm on stove
* Use immersion blender or regular blender and blend until smooth and a sauce like consistency
* Cook pasta as you usually would and top with sauce 

Tomato Soup - Dish #3
  • cooked leftovers/extras from Dish #1
  • 2 carrots, diced
  • 2 celery stocks, diced
  • 1 bay leaf
  • 4 cups of soup stock or 4 cups of water + 1.5 bouillon cube(s)
* Combine all the ingredients in a pot on your stove, bring to a boil, then turn down and let simmer
* Remove bay leaf, and puree the mixture
 Voila... Soup!!! Makes a great lunch or starter for any dinner!

Monday, June 11, 2012

3 Minutes Prep, One Dish, 7 Ingredients = Dinner Delight

With the recent amazing weather who wants to come inside early to spend an hour cooking dinner? Not me and defiantly not my boys. The following recipe is one that I make in minutes, makes a generous amount and all of it, even the leftovers, are gobbled up! Tip: Double it and freeze some for lunches!

Chicken, Shrimp and Rice
  • 1 cup uncooked white rice
  • 2 cups water with 1 chicken bouillon cube or 2 cups chicken stock
  • 6 chicken thighs, bone in
  • 6-8 large shrimp, peeled
  • 1 Tbsp taco seasoning
  • 1/2 Tbsp jerk seasoning
  • salt and pepper, to taste
* Preheat oven to 350
* Put all the above ingredients in a Pyrex baking dish (8.5x 8.5 is probably easiest), then stir
* Cover with tin foil and cook for approximately half an hour. Stir the ingredients about 3 times through out the cooking process to ensure even cooking. You may need to add slightly more water if it is evaporating before the rice is cooked. The end result should be a fairly moist rice, but not soupy
* Turn up for 10-14 minutes to 400 to ensure everything is cooked and most of the excess liquid is absorbed. Oven temperatures very so this is a general time.


Serve with a salad and a vegetable(s) on the side and enjoy...now wasn't that easy!!

Monday, December 5, 2011

Yummy Brussel Sprouts...Yes Yummy!

Brussel Sprouts generally aren't anyone's favorite vegtable. Even veggie lovers don't rave about the 'sprouts' they had last night. This recipe may change that!

I make the following recipe and we never have left overs, even my 3 year old loads up on them!

Brussel Sprouts
  •  1-2lbs brussel sprouts, dry/brown stem thinly sliced off
* Place brussel sprouts in steamer over boiling water and steam for 6-8 minutes,the sprouts should still be firm since they will be sautéed. No mushy sprouts here!
* Remove from heat rinse for 30 seconds under cold water
* Cut sprouts in half vertically. (through stem and top, not through middle)
  •  1-2 Tbsp Extra virgin olive oil
  • sea salt and pepper to taste
* Warm oil in pan on medium-high heat, when hot place flat side of sprout down in oil
*  After 5 minutes sprinkle with sea salt and turn over. Sprouts should be golden brown
* After another 4 minutes coat with pepper and more salt (if needed)

Enjoy!

(this recipe is modified from Gwenyth Paltrow's My Father's Daughter)

Sunday, July 17, 2011

Rachel Ray's Green Beans 'n' Shrooms

I tried Rachel Ray's Green Beans 'n' Shrooms recipe the other night and liked it. The beans till had some firmness to them and the mushrooms were a great addition. It was super simple and quick to make. I made it ahead and served it cold, it was equally as yummy as when warm. The only thing I modified was olive oil for the butter, added garlic when I combined the mushrooms and beans and omitted the almonds. (I was out but will try them next time. I love toasted almonds.)
This recipe is defiantly worth adding to the regular line up.

Monday, July 11, 2011

Baked Kale

I am sure by now you have heard at least one celebrity saying that they cook up baked Kale and snack on it as a way to have something crispy & salty while being low cal and healthy. If you haven't tried this trick I recommend it, if not for the health benefits at least for the taste.
Kale The Super Food


Not only is Kale insanely healthy for you (it is actually one of the healthiest foods that you can eat) this actually tastes great too. I don't know what it is about this simple snack, but I can eat literally the whole tray of it in a sitting. I think it is the combination of the salt and the flakiness of the Kale. Kale is known to lower cholesterol, reduce the risk of 5 different cancers and help the body to detoxify, just to name a few of its benefits. For more information and a nutritional break down go to this site.

To cook it simply wash the Kale, cut and discard the center hard stems then cut the leaves into 1"-2" pieces. Remember it shrinks when it cooks and will break apart so they don't need to be too small. Sprinkle with just enough Olive Oil to lightly coat the Kale then top with sea salt. Bake at 475, stirring frequently until the pieces crisp up and turn brownish. You may prefer them super done so they crumble or less done so they are slightly chewy. Near the end it goes from almost done to burnt rather quickly, so keep an eye on it.

Enjoy your yummy and healthy snack!

Thursday, July 7, 2011

'Buffalo' Chicken Breast Strips

Last night I prepared chicken that I had planned to put on the BBQ. Little did I know our BBQ was still apart, in the mid-cleaning phase. So I took the chicken and pan seared it, then coated it in additional sauce. The result was delicious. . . like really, really delicious.

I used a sauce called Piri-Piri. It is of Portuguese origin and is crazy good. We purchase ours from a local Portuguese restaurant that has had so many requests for this sauce that they have started to bottle it and sell it. If you don't have any you could use a spicy BBQ sauce or there are recipes for it online. My below recipe calls for 1/8 of a cup of two ingredients, I recommend using 1/4 measuring cup and filling it half way with one and then the other. You'll save dishes and it is easier to measure.

'Buffalo' Chicken Breasts
  • 3 Chicken breasts, but into 1" strips
  • 1/4 cup lemon juice
  • 1/4 cup BBQ sauce
  • 1/4 cup Piri-Piri sauce
  • 1/2 tsp pepper
  • 1 tsp spicy pepper medley (or any other spices similar, Montreal Seasoning, Steak Rub)
* Combine ingredients and let chicken marinate for 2 hours or overnight
* Either BBQ chicken or pan sear on high heat until cooked. Keep adding tiny amounts of water to prevent the chicken from blackening on pan

'Buffalo' Toss
  • 1/4 cup BBQ sauce
  • 1/4 cup Piri-Piri sauce
* Put the 2 sauces in the bowl toss in cooked chicken.

You are going to love these! Enjoy!

Tuesday, July 5, 2011

Super Simple Salmon

Whether or not you are a big salmon lover it is always a good idea to have a safe full-proof recipe on standby. You never know when you may have guests that do not eat red meat or chicken, but do eat fish. In the fish world salmon is a fairly safe bet. Not overly fishy, not too flaky, delicate or tough, it generally is a crowd pleaser (at least for people who like fish).

This recipe is my go to recipe and I always get compliments on it. It is super simple and quick, even my son requests salmon and quinoa for dinner. I recommend buying the whole side of a salmon and freezing what you don't need or buying the fillets. If you buy the salmon steaks (the ones that look similar to U's) you end up spending half your meal picking out little bones.

Super Salmon
  • Salmon, desired amount
  • Olive oil
  • Lemon Pepper (made by Club House)
  • Dill, dried
  • Pepper
  • Salt (optional) the first ingredient in the Lemon Pepper is salt, in order to avoid drying the fish out by over salting it I prefer to cook it without additional salt and add it once served if I feel it is warranted.
* Preheat oven to 425
* Lightly oil baking dish placing skin side down, if there is no skin place the side where it was down
* Sprinkle with lemon pepper until salmon is totally covered but in a very thin layer
* Top with a light sprinkle of the dill
* Cook for 12-15 minutes, or until flakes apart when poked with fork
* I like to broil mine for about 3 minutes , just enough to get all that seasoning to slightly sear onto the salmon

Enjoy!

Monday, July 4, 2011

Blue Menu Yogurt Smoothie Review

The other day in the grocery store with my son I came across the "New!" PC Blue Menu Yogurt Smoothie. They only had mango flavour in stock but according to the website there is vanilla, strawberry and mixed berry flavours available as well. I decided this would be the perfect 'treat' for my son.

I remember my mom buying us Yop as children, if we were good in the grocery store. We fell for this 'treat' every time. Our own individual drink and it was pretty sweet too. . . we loved it. My mother wasn't big on processed stuff. Until we were old enough to really voice our opinion she bought plain yogurt and added homemade jam to it. So this really was a treat!

This drink was on sale for $1.49 usually it is around $2. It has 190 calories, only 1.5g of fat (only 1 being saturated), and 38g of carbs. It has 4 grams of fibre, which is 16% of your daily recommended value. That is defiantly a plus for this drink. I am allergic to dairy, but did taste a tiny amount. It was good, sweet but not too sweet. It had a smooth texture and the mango tasted like real mangoes, as opposed to some chemical tasting yogurts that I have tried. My son inhaled it!


Would I buy it again? As a 'treat' yes, but as a regular addition to my grocery list, no. Smoothies are so easy to make and I like to know the quality of fruit going into my smoothies. If my son was to drink 1 a day that would be $14, while not bad I could make a lot of smoothies for that.